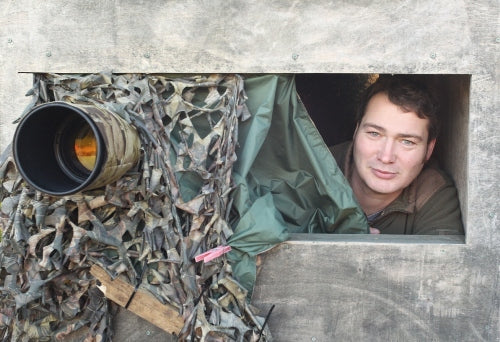
I use hides a great deal. Once I am certain I know an animal or bird will appear in the same spot again and again – for instance if I've found a badger sett, fox den, or birds in a nest – I set about building a hide. I tend to make wooden hides as they are more stable and weather proof. Over the years I have developed my own designs and now build hides that are quick to put up and even have shelves and storage space for all my equipment. I spend a lot of time in them, so they need to be comfortable. My badger hide, for example, is insulated and has double glazed windows and a heater. It needs to be, I can spend up to four or five hours on a winter’s night in there.
Most of my hides measure roughly four foot square and six foot high with a main opening at the front and a sturdy shelf to bolt my tripod heads onto. I use up to three cameras at once so I don’t want tripods to get in the way. I like to be at eye level to my subjects, or just above them, and so if my subject is up high I use towers. I either make wooden towers or place a platform in a tree and use a scaffold to get up there.
 |
| Possibly the hide with the best view, I built this to watch buzzards in Snowdon, Wales |
It can be frustrating being in a hide since you have a very limited view and if your subject is very sensitive you have to be extremely patient to wait for it to hone into view. Recently I’ve added a CCTV camera with a seven inch screen so that I have a wider view. I carry a battery pack to fuel this.
But I still rely heavily on my field craft. One of the first signs that a subject is close at hand is the noise of birds calling out in alarm, if I am studying a predator, or the sound of chicks calling their parents, if I am at a nest.
I use popup hides and canvas hides when I am travelling. And for mobile subjects like hares, deer or otters I use camouflage jackets and trousers to hide. I have a whole wardrobe of appropriate clothing, thick ones for winter and thin ones for summer. The summer gear often gets ripped on barbed wire or brambles but I find it invaluable because it scrunches up into
tiny spaces so I can quickly put them over my normal clothes. It is important that I blend into the background. I sometimes use a wide piece of camouflage netting which I’ve attached to a T-shaped piece of wood so it hangs like a curtain. I tie the central post to my Wimbley head to create a one-sided mobile hide. It doesn’t work so well in a bramble patch or in strong winds but I have got some amazing results with it on still days.
 |
| Camouflage netting over a T-frame hides me and a camera in the field |
 |
| The set up is very effective when viewed from the front |
In snow, I’ve had some interesting times trying to blend into a white backdrop, including once donning a disposable DIY white suit and wearing a pillowcase on my head as a balaclava and white oven gloves on my hands to photograph hares. I even customised my tripod and camera with white covers. I've since invested in a snow white ski suit which is nice and warm.
 |
| I've taken some of my best photographs of hares whilst in my camouflage suit |
 |
| Which I went on to develop into this painting. |
Knowing when to be still and when it is OK to edge forward, or when to stop taking photographs, is the key. This comes with experience. Only the other day I scared off a buzzard by flipping my 1:4 converters in my 200 to 400 lens. I’d been waiting five hours for it to appear! Birds of prey can see down your lens and even see the lens as it focuses. I’ve found they can even see my shutter moving.
At home I use my house as a giant hide. I have planted my garden with shrubs and hedging to provide plenty of cover and there are feeding stations and nest boxes throughout. I’ve positioned feeding boxes for stoats and weasels outside the kitchen window and feed birds of prey outside the living room window.
I also use plenty of hides in the garden. This year I made my most ambitious hide yet, reached by an underground tunnel leading from my house. The idea for a tunnel arose after I became increasingly frustrated by the fact that if I spotted something I wanted to photograph outside the living room, it inevitably spotted me as I slunk out of the house and into the hide. Invariably it had disappeared before I got a shot.
The tunnel is made from a six-metre long three-foot wide drainage pipe. I use a trolley and pulley system to manoeuvre down its length. Now that I can slip into my tunnel and be in the hide
undetected, I have been able to photograph the kestrels, tawny owls and even a family of weasels outside more easily.
undetected, I have been able to photograph the kestrels, tawny owls and even a family of weasels outside more easily.
I’ve also upgraded the hide. It is now very high tech with more than 20 wildlife cameras linked to five TV monitors showing me live images of all the wildlife activity in the garden at any one time. I really cannot miss any action whilst I’m in there!


